- Version control (general)
- Git version control
- An introduction to Git
- Part I: linear history
- Jupyter Notebooks
- Motivation for a reproducible system for Python Jupyter notebooks
- Constructing a reproducible Python notebook environment
- Julia
Constructing a reproducible Python notebook environment
In a previous post I talked about why it's important to set up your Jupyter notebook environment to be reproducible, yet simultaneously be kept isolated from your other project. In this post, we're going to look at how I do that.
The nice thing about this is that pretty much every part is modular, so you can adopt the parts that work for you at the moment without having to adopt all of them. The only part that's needed for some of the other parts to work is to create an environment for your notebook.
Prerequisites
The only prequisites are:
- You have Anaconda Python installed (and so access to the
condacommand) - You have
gitinstalled - You be able to get around in the Terminal
Additionally it will help if you are familiar with Python packages
and the setup.py file. I'll
try to write this so that if you're not familiar with these concepts, you get enough information
here, but to cover every aspect of them would make this post way too long.
Overview
Remember from before that we have 5 goals. Those goals, and the solutions to them, are:
- Must be able to go back to previous days' work. Solution: create notebooks for each day, don't edit old notebooks.
- Must be able to isolate dependencies from project to project. Solution: use
condaenvironments. - Must be able to move the project from one system to another. Solution: version control the notebooks and an environment file.
- Must be able to reuse code across notebooks easily. Solution: create a package for reused code and install it into the environment.
- Must be able to reuse code between projects easily but allow each project control over what version of that code it uses. Solution: add each package as a Git submodule.
Let's start. Feel free to follow along.
Step 1: create a Conda environment
If you've never used them before, a Conda environment is basically a separate installation of Python that can have it's own packages and even non-Python libraries. When you install Anaconda, it creates one environment for you - the "base" environment. Unless you turned off auto-activating that environment, whenever you start a terminal you probably see a prompt that looks like this:
(base) josh@TemporisDomis20:~$
The important part is the (base) right at the beginning - that's your active Conda environment. If I run python
now, I'll have access to all the packages in the base environment. If I use the conda install command to install
new packages, they'll be added to the base environment. Because that indicates which environment is active, I'll
include it in any Terminal lines you need to run. Even if it's there, you only type that part after the $.
While it's convenient to have all the packages you use in the base environment, it's a nightmare if, say, you have a bunch of code that depends on netCDF4 v1.3.0 but you want to upgrade to v1.4.0 for your next project. Environments give us a way around that. If I create the "project-one" environment and install netCDF4 v1.4.0 into that, then the base environment can still have netCDF4 v1.3.0.
Creating an environment
Conda has detailed documentation
about environments. Here I'll just focus on the essentials. To create a new environment, we use the conda create
command, which looks like:
(base) $ conda create -n <env name> [dependency1 [dependency2...]]
Breaking this down:
conda create: "conda" is the main command and "create" is the subcommand that tells conda we are making a new environment.-n <env name>: this lets us specify what name we refer to the environment as.[dependency 1 [dependency 2]]: we can specify as many packages we want installed in the environment as we want. If we don't specify any, we'll just create an empty environment (which is fine, we can add packages later).
An example is:
(base) $ conda create -n demo-env python=3 ipykernel
This will create a new environment named "demo-env" and install Python 3 and the ipykernel package. (The =3 in python=3
tells conda that it can only install a Python that is version 3. In contrast, we don't require any version for ipykernel.
And yes, you should be using Python 3 now, not Python 2.) We'll need both Python and ipykernel for any environment you
want to use with a notebook, so it makes sense to install them both from the start. (If there's other packages that you know
you'll need, like matplotlib or numpy, you can list them here too.)
Connecting to notebooks
Now that we have our environment, we need to tell Jupyter that it's available to use. To do that, we can use ipykernel. First
we need to activate our environment:
(base) $ conda activate demo-env
(demo-env) $
You should see the environment name in parentheses before the $ change to say "demo-env". This tells you that you have the
"demo-env" environment active. If so, we can link this to Jupyter with:
(demo-env) $ ipython kernel install --user --name=demo-env
Installed kernelspec demo-env in /home/josh/.local/share/jupyter/kernels/demo-env
The "Installed kernelspec in..." message tells you it was successful. Let's break this command down:
ipython kernel install: similar to the "conda create" command,ipythonis the main command andkernelis a subcommand that tells IPython we need to do something with a notebook "kernel". (For Jupyter notebooks, the kernel is what actually executes the code you give to the notebook.)installis a sub-subcommand saying we want to install this kernel so that Jupyter can use it.--user: this tells IPython to install the kernel into the "user" directory rather than the "system" directory. This is important because usually the "system" directory is somewhere we, as a regular user, don't have access to.--name=demo-env: this specifies the name we want Jupyter to know this kernel (and this environment) by. I made it match the environment name - you don't have to (you could name the environment "harry" and the kernel "sally" for all it matters) but I find it a lot easier to keep track of things when the kernel and environment have the same name.
Once we're done with this we can deactivate the "demo-env" environment to go back to "base" with:
(demo-env) $ conda deactivate
(base) $
Using our environment in a notebook
Now let's fire up Jupyter Lab and create a new notebook. When we do, the launcher will present a new option.
Now we can create a notebook or console that uses our "demo-env" kernel. (This will be the name we gave to
the ipython kernel command, not the conda create command - if those were different.) Here's what my
launcher looks like (I have quite a few kernels).
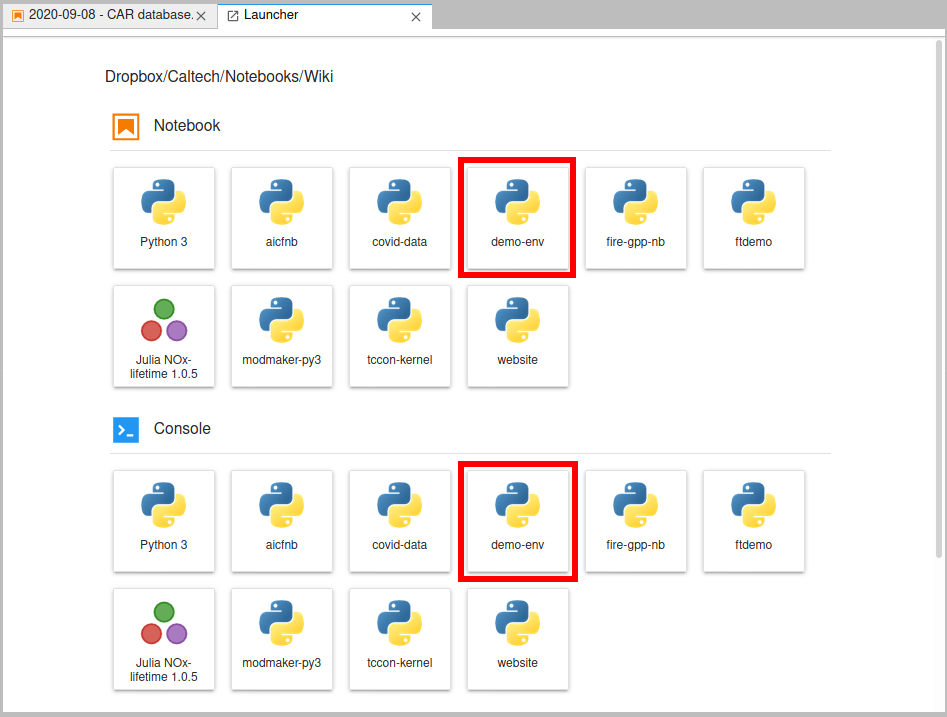
If you click on the "demo-env" box under "Notebooks", you'll get a normal notebook. But if you look in the upper-right corner, you'll see it says "demo-env". Normally that would say "Python" or "Python 3". That tells us what kernel the notebook is using. If you click on it, you'll get a pop up box that lets you pick a different kernel - so if you started a notebook using the base "Python 3" kernel, you can always switch to a custom kernel, for example.

Note that if you do switch kernels, it's like any other kernel restart - you lose any variables/functions/etc. that were defined in the notebook, and you'll have to run all your code from scratch.
We can prove this is using a different environment a few ways. First run the code below in your notebook:
import sys
sys.executable
You'll see this points to something like /home/josh/anaconda3/envs/demo-env/bin/python; notice that it's under
envs. Your normal Python executable, with Anaconda, would be something like /home/josh/anaconda3/bin/python.
Second, try to import a package installed in the "base" environment that you didn't install in this one, like numpy.
You'll get an ImportError.
Now you can install packages in this environment, and not worry about screwing up other environments. As long as you create one environment for each project you're working on, you don't have to worry about one project messing up another one. Speaking of installing...
Installing more packages
You'll want to install packages from the command line. Don't use the
%conda magic in the notebook
as that will affect the "base" environment and not our custom one! Instead, go to the terminal and activate
your environment, e.g.
(base) $ conda activate demo-env
(demo-env) $
Then you can use conda install to install new packages:
(demo-env) $ conda install numpy
Deleting an environment
If you ever need to clean up an environment, you'll want to both 1) delete the environment and 2) delete the kernel. (If you don't delete the kernel, you just have a kernel that will try to call a Python that doesn't exist.) To delete the environment, make sure it's not the active environment, then do:
(base) $ conda env remove -n demo-env

Remove all packages in environment /home/josh/anaconda3/envs/demo-env:
replacing "demo-env" with whatever you called your environment. Even if it doesn't list any packages, this message means it succeeded. Then to delete the kernel, do:
(base) $ jupyter kernelspec uninstall demo-env
Kernel specs to remove:
  demo-env              /home/josh/.local/share/jupyter/kernels/demo-env
Remove 1 kernel specs [y/N]: y
[RemoveKernelSpec] Removed /home/josh/.local/share/jupyter/kernels/demo-env
Answer "y" when prompted, and this message indicates the kernel was removed - it should no longer show up as an option for your notebooks in Jupyter Lab.
- Version control (general)
- Git version control
- An introduction to Git
- Part I: linear history
- Jupyter Notebooks
- Motivation for a reproducible system for Python Jupyter notebooks
- Constructing a reproducible Python notebook environment
- Julia

 https://orcid.org/0000-0002-8599-4555