- Version control (general)
- Git version control
- An introduction to Git
- Part I: linear history
- Part 1, Lesson 1: Installing Git
- Part 1, Lesson 2: creating a repo and making the first commit
- Part 1, Lesson 3: making more commits
- Part 1, Lesson 4: reviewing history
- Part 1, Lesson 5: removing files
- Part 1, Lesson 6: going back to old commits
- Part II: branches
- Jupyter Notebooks
- Motivation for a reproducible system for Python Jupyter notebooks
- Setting up Jupyter
- Constructing a reproducible Python notebook environment
- Type systems
- Programming language pros and cons
- Julia
- Rust
Part 1, Lesson 1: Installing Git
The first step to using Git is, of course, to install it. It may already be installed on your system. We'll check first.
Windows
Is it installed?
There are two ways to check if it is installed:
- Type "Git" in your search box. If you see "Git GUI" and "Git Bash" as options, it is installed.
- Right click in the main area of the file explorer as shown below. If you see "Git GUI" and "Git Bash" in the context menu, it is installed.
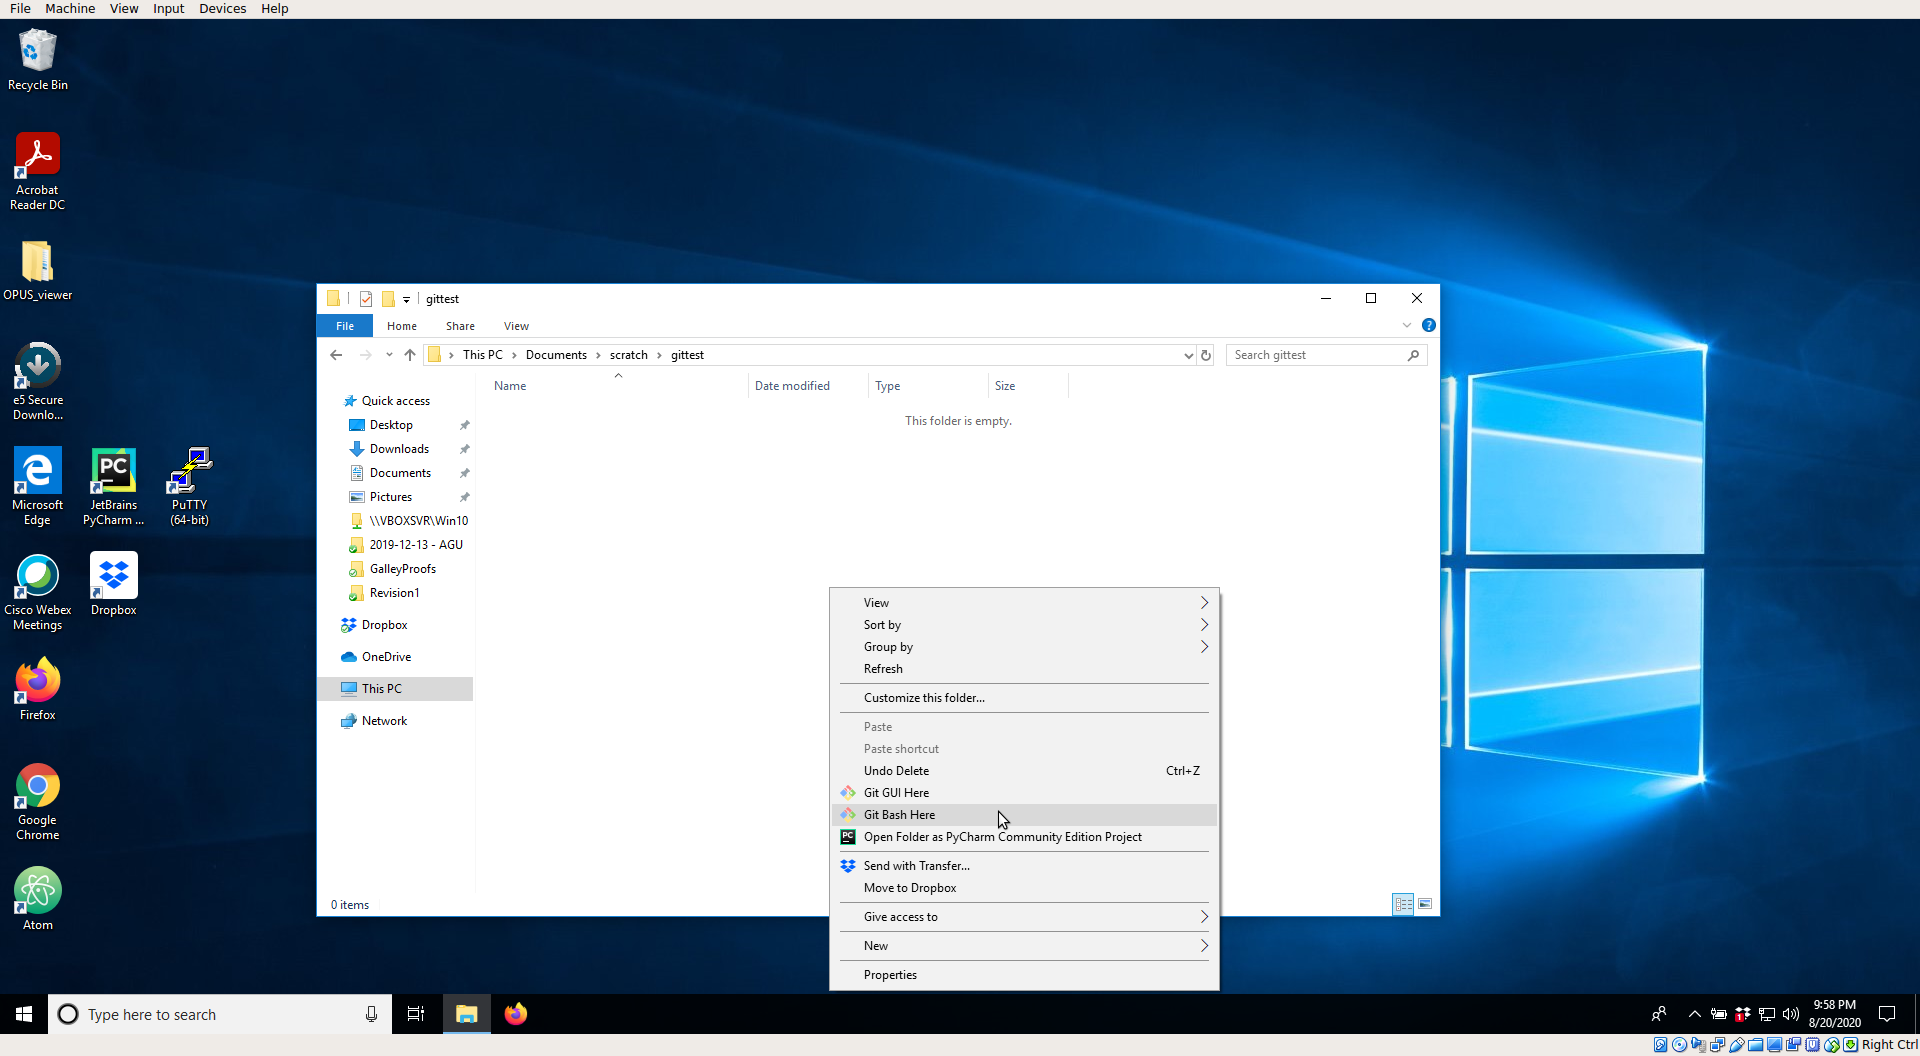
Note that this is also the easiest way to launch Git Bash (which is what we will be using). When you launch it via the right-click menu, the bash terminal starts in this folder.
Installing
To install, download the Windows package from https://git-scm.com/downloads. Launch the installer like a normal Windows installer.
The first page of the installer will pop up with a number of options to enable or disable.
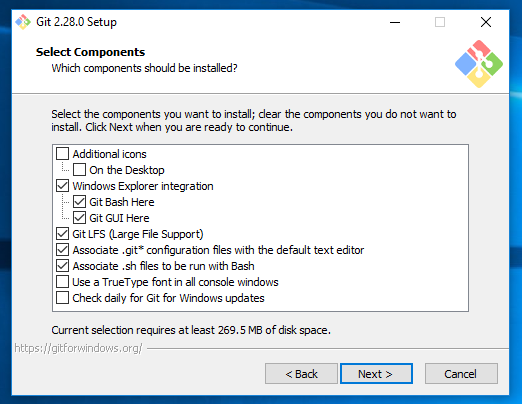
The three you definitely want checked are:
- Git Bash Here
- Git GUI Here
- Associate .git* configuration files with the default text editor
You may uncheck Git LFS if you want, but it doesn't interfere with anything, so I would leave it checked.
The "Associate .sh files to be run with Bash" is one you should uncheck if you already have .sh files
that should be run with something else - this is uncommon for Windows, so it's usually okay to leave it
checked.
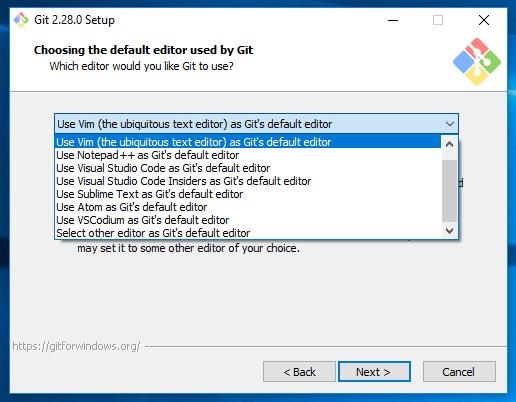
The next page will ask what editor you want to use for your commit messages. The default (vim) is, as the warning says, not very intuitive. I recommend choosing one of the other editors, which are normal GUI editors (whereas vim is in the terminal). If you already have one of the ones listed installed, use that. Otherwise, Notepad++ is the most lightweight and so will launch the quickest. If you don't use any of the other ones, then I recommend Notepad++. Note: you won't be able to click "Next" if you have selected an editor that is not installed. In that case, cancel the Git installation, install your desired editor, then try Git again.

There will be several more dialogues, I recommend keeping the defaults for all of them.
Mac
Is it installed?
Open your Terminal. The easiest way is to do a Spotlight search (with Cmd+Spacebar) and search for "Terminal" -
it'll be the one with a mostly black box as an icon. When it launches, type git --version. If it prints something
like git version 2.28.0 on the next line (your number may differ), then it is installed. If it prints
git: command not found then you will need to install it.
Installing
The main Git page for Mac (https://git-scm.com/download/mac) gives several options. Although installing via Homebrew is the first option, if you don't have Homebrew already installed, that might be more than you want to deal with. (I will say, having Homebrew installed can be very helpful in data science.) Either the Xcode or binary installer methods are easiest. The binary installer is just like any other app installer. To install with Xcode, in the Terminal type:
xcode-select --install
and this should install Git along with some other command line tools. Note: you do not need the full Xcode package, only the command line tools.
Linux
Is it installed?
Most Linux distributions come with Git preinstalled. You can check by opening your Terminal and typing
git --version. If it prints something like git version 2.28.0, then it is installed. If you see
git: command not found or something like The package git is not installed. You can install it with...,
then it needs installed.
Installing
The main Git Linux downloads page (https://git-scm.com/download/linux) lists how to install it for many Linux
distributions. In all cases you will install it through your package manager (e.g. apt, yum, etc.)
- Version control (general)
- Git version control
- An introduction to Git
- Part I: linear history
- Part 1, Lesson 1: Installing Git
- Part 1, Lesson 2: creating a repo and making the first commit
- Part 1, Lesson 3: making more commits
- Part 1, Lesson 4: reviewing history
- Part 1, Lesson 5: removing files
- Part 1, Lesson 6: going back to old commits
- Part II: branches
- Jupyter Notebooks
- Motivation for a reproducible system for Python Jupyter notebooks
- Setting up Jupyter
- Constructing a reproducible Python notebook environment
- Type systems
- Programming language pros and cons
- Julia
- Rust

 https://orcid.org/0000-0002-8599-4555